
Installing Updates on GNU/Linux using Ansible
1. März 2024 In the realm of virtualization and cloud computing, migrating virtual machines (VM’s) across different hypervisors is a common challenge that IT professionals face. Such migrations often involve dealing with foreign images – VM images that were created or used in a different hypervisor environment. For instance, you might receive a vendor supplied VM image tailored for VMware when you are transitioning your infrastructure to Proxmox. This article aims to shed light on how to import these foreign images into Proxmox VE.
-
Importing QCOW2 Images: QCOW2 is another widely used format for VM images, especially in environments running QEMU/KVM. We will discuss how to import these images into Proxmox.
-
Importing VMware OVA/OVF Images: This scenario covers the process of importing VMs from VMware which uses OVA/OVF formats for its VM exports, which can be imported into Proxmox with some preparation.
While Proxmox offers good integration with automation and orchestration tools like Ansible and Terraform, which can significantly streamline the migration and management process, here are the manual steps required to import foreign images. This ensures a foundational understanding of the process, which can be beneficial even when employing automation tools for larger scale migrations.
Importing a Foreign QCOW2 Image into Proxmox
Occasionally, you may need to import external QCOW2 images into Proxmox. This process entails supplying the images, establishing a new virtual machine (VM), and then importing the image into Proxmox.
Create a basic new VM
- General: Choose a VM name
- OS: Do not use any media
- OS: Choose the guest OS (according to your needs)
- System: If you plan to use Qemu Agent check it
- Disks: Delete the default disk as our disk will be added later
- CPU: According to your application select your CPU’s
- Memory: According to your application select your memory
- Network: Choose your Hypervisor VM bridge and/or your VLAN

Finish the VM creation dialog by pressing Finish
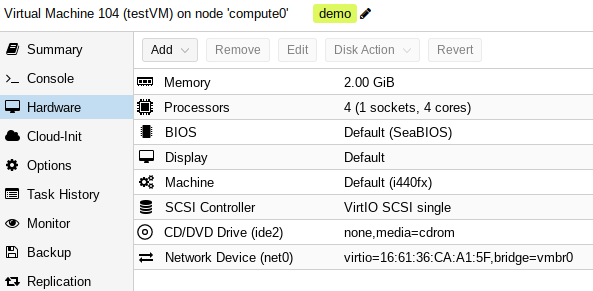
The newly created VM will look like shown in the screenshot
Downloading an Image
For demonstration purposes, we are providing a basic Debian GNU/Linux image, which is available for download.
root@compute0:/mnt/pve/ISO/template/qcow# curl -LO https://cloud.debian.org/images/cloud/bookworm/latest/debian-12-nocloud-amd64.qcow2
  % Total    % Received % Xferd  Average Speed   Time    Time     Time  Current
                                 Dload  Upload   Total   Spent    Left  Speed
100   353  100   353    0     0   2595      0 --:--:-- --:--:-- --:--:--  2595
100  347M  100  347M    0     0  20.9M      0  0:00:16  0:00:16 --:--:-- 21.9M
Importing the Image
Importing the image using the qm importdisk command requires including the Machine ID of the newly created VM, in this case, 103.
root@compute0:/mnt/pve/ISO/template/qcow# qm importdisk 103 debian-12-nocloud-amd64.qcow2 SSD-Pool
importing disk 'debian-12-nocloud-amd64.qcow2' to VM 103 ...
transferred 0.0 B of 2.0 GiB (0.00%)
transferred 20.5 MiB of 2.0 GiB (1.00%)
transferred 41.0 MiB of 2.0 GiB (2.00%)
transferred 61.4 MiB of 2.0 GiB (3.00%)

[..]

transferred 1.9 GiB of 2.0 GiB (97.11%)
transferred 2.0 GiB of 2.0 GiB (98.12%)
transferred 2.0 GiB of 2.0 GiB (99.12%)
transferred 2.0 GiB of 2.0 GiB (100.00%)
Successfully imported disk as 'unused0:SSD-Pool:vm-103-disk-0'
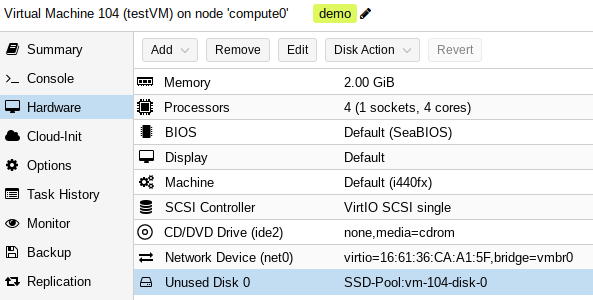
After the import your VM will look like:
Final steps
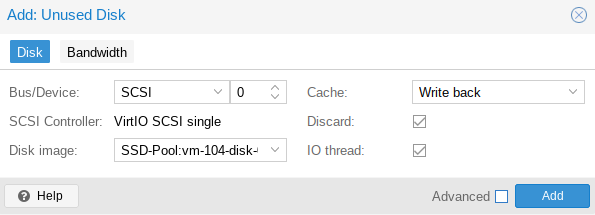
As you can see your disk is marked unused, which is normal. Highlight the disk a click on Edit, then on Add.
You need to modify your boot order to be able to start your VM. Click on Options and then Edit the Boot Order field.
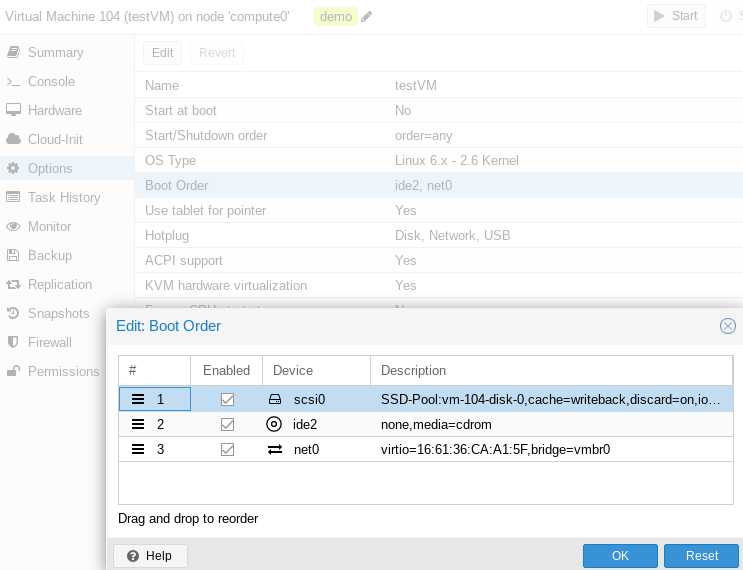
Your VM is now ready to work.
Importing an OVF File into Proxmox
Transitioning between hypervisors is a common task in the realm of virtualization. One of it is VMware. From VMware you export your VM’s as OVA (Open Virtual Appliance) files, which are basically TAR files. It contains the disk files (VMDK), a manifest (MF) and a descriptor file (OVF).
- Disk Files (VMDK): These are the virtual disk files that store the VM’s data.
- Manifest (MF): A file containing a list of all files included in the OVA package, along with their checksums, ensuring integrity.
- Descriptor File (OVF): This XML file describes the VM’s configuration, such as hardware requirements and settings.
Note: To create OVA files is not scope of this article. If you are interested to you can look at VMware’s OVF Tool
Extracting the OVA file
The first step is to copy the at one Proxmox Hypervisor. Then you can extract the contents of the OVA file. This can be accomplished using a simple command line instruction:
root@compute0:/mnt/pve/ISO/template/qcow# tar -xvf Debian_11.1_VMware.ova
Debian_11.1_VMware.ovf
Debian_11.1_VMware.mf
Debian_11.1_VMware-disk1.vmdk
Running this command will unpack the OVA’s contents into your current directory, allowing you to access the VMDK disk files, the manifest, and the OVF descriptor file directly.
Importing the VM into Proxmox
The OVF and VMDK files play crucial roles in importing into Proxmox. The OVF file encompasses the entire virtual machine (VM) description, meaning there is no need to manually create a VM beforehand. It will automatically be generated by the qm importovf command.
Attention: It’s essential to assign a new Machine ID when using the
qm importovfcommand.
For instance, the commandqm importovf 110 Debian_11.1_VMware.ovf SSD-Poolimports the specified image into a new VM with the ID 110, allocating it to the storage pool named SSD-Pool.
root@compute0:/mnt/pve/ISO/template/qcow# qm importovf 110 Debian_11.1_VMware.ovf SSD-Pool
transferred 0.0 B of 512.0 GiB (0.00%)
transferred 5.1 GiB of 512.0 GiB (1.00%)
transferred 10.2 GiB of 512.0 GiB (2.00%)
transferred 15.4 GiB of 512.0 GiB (3.01%)

[..]

transferred 497.7 GiB of 512.0 GiB (97.20%)
transferred 502.8 GiB of 512.0 GiB (98.20%)
transferred 507.9 GiB of 512.0 GiB (99.20%)
transferred 512.0 GiB of 512.0 GiB (100.00%)
Your new VM
When the steps above completes successfully you will discover your new VM in the Proxmox Web UI
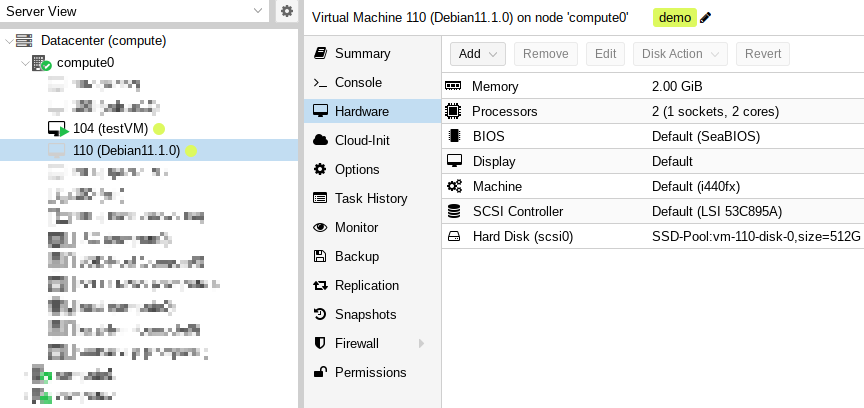
Or it can be proofed which the following command:
root@compute0:/mnt/pve/ISO/template/qcow# qm config 110
boot:
cores: 2
memory: 2048
name: Debian11.1.0
scsi0: SSD-Pool:vm-110-disk-0,size=512G
smbios1: uuid=377318f8-30ec-4b47-b417-6dcb477c6a08
tags: demo
vmgenid: ac4801f5-8f23-4c28-a584-3ce0cae17fbe
As you can see, the VM is lacking for example an network adapter. Feel free to modify the hardware of the VM.
