A Backup Strategy through the Power of Ansible and Restic
30. April 2024Introduction
 This article is a introduction to deploying virtual machines on the Proxmox VE environment.
First, there are multiple ways to deploy virtual machines on Proxmox. Let’s consider using Terraform as an alternative to Ansible. With Terraform, we gain state management, meaning Terraform records each activity, which is useful for clean-up later. However, Ansible offers a robust implementation of the Proxmox API. Using Ansible allows us to handle many of these tasks seamlessly without interrupting our workflow.
We are going to demonstrate the deployment of a Debian GNU/Linux VM. To keep it simple, we will use a stripped-down Ansible role. When using Ansible, you have several options for deploying a VM, such as using a Debian Cloud Image. However, we decided to create and use a VM template because several necessary configurations are already deployed in this template. Furthermore, we are going to use cloud-init to configure the VM for its target use.
Basic knowledge in dealing with Ansible, Proxmox and cloud-init are required.
We have the following file tree for this demo:
➜ tree
.
├── hosts.ini
├── proxmox_create_demo_vm.yaml
├── proxmox_prepare.yaml
└── roles
    ├── proxmox_create_demo_vm
    │   ├── defaults
    │   │   └── main.yaml
    │   ├── tasks
    │   │   └── main.yaml
    │   └── templates
    │       └── user-data.yml.j2
    └── proxmox_prepare
        └── tasks
            └── main.yaml
Creating the VM template
Ensure you have a Proxmox VE template on your VM. If you don’t have one, create it by right-clicking on the VM and selecting Convert to template We will be working with a template named Debian12 furtherdown.
Please ensure that your VM supports cloud-init, which should be the case, if you have a recent installation.
Prepare Proxmox
We need a wrapper to control the Proxmox API called Proxmoxer. You have the option to install it on the Ansible server or on the Proxmox VE hosts.
Pay attention to the target server you specify in your Ansible playbooks. If you choose to install it on the Ansible server, you need to use localhost as the host in your playbook. We chose the latter option and installed it on the Proxmox VE hosts to keep our playbooks more consistent.
When installing Proxmoxer, you need to decide on the version. The version that comes with Proxmox VE is likely too old to work with the most recent Ansible version. For this reason, we installed it using Python pip. If you decide to use the official Debian package, just remove the comments (#) in the role file commands.
---
# roles/proxmox_prepare/tasks/main.yaml
# Prepare the Proxmox hosts

#- name: Ensure pip is installed
#  ansible.builtin.apt:
#    name: python3-proxmoxer
#    state: present
#  become: yes

- name: Ensure python3-pip is installed
  ansible.builtin.apt:
    name: python3-pip
    state: present
  become: yes

- name: Install Proxmoxer Python module
  ansible.builtin.pip:
    name: proxmoxer
    state: present
    executable: pip3
  become: yes
Our playbook for this role is as follows:
---
# Prepare Proxmox nodes
- name: Prepare Proxmox nodes
  hosts: compute_cluster
  roles:
    - role: proxmox_prepare
This can be applied by using the following command:
➜ ansible-playbook proxmox_prepare.yaml -i hosts.ini

PLAY [Prepare Proxmox nodes] *********************************************************

TASK [Gathering Facts] ***************************************************************
ok: [compute0]
ok: [compute2]
ok: [compute1]

TASK [proxmox_prepare : Ensure python3-pip is installed] *****************************
ok: [compute1]
ok: [compute2]
ok: [compute0]

TASK [proxmox_prepare : Install Proxmoxer Python module] *****************************
changed: [compute2]
changed: [compute1]
changed: [compute0]

PLAY RECAP ***************************************************************************
compute0                   : ok=2    changed=1    unreachable=0    failed=0    skipped=0    rescued=0    ignored=0
compute1                   : ok=2    changed=1    unreachable=0    failed=0    skipped=0    rescued=0    ignored=0
compute2                   : ok=2    changed=1    unreachable=0    failed=0    skipped=0    rescued=0    ignored=0
API Tokens
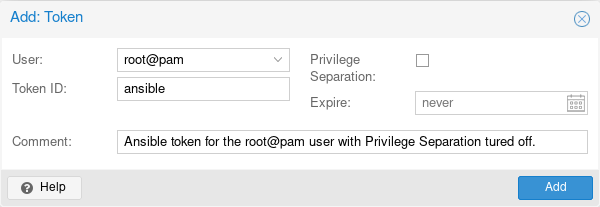
Again multiple ways exist to access to Proxmox API. We decided to use API keys, because it is convienant. As we want it be able to access the full API give the token root access. If you want to can create a dedicated user for it.
Go to Datacenter > Permissions > Add:

Ensure to deactivate Privilege Separation, we need to give the API key full privileges of the associated user.

Copy the token, it will only be displayed once. And put it to roles/proxmox_create_demo_vm/defaults/main.yaml. And yes you should work with a Ansible vault to be save. For the sake of simplicity, we have omitted it here.
You can find more information of the Proxmox User Management in the Proxmox Wiki.
Preparing the Snippet Storage
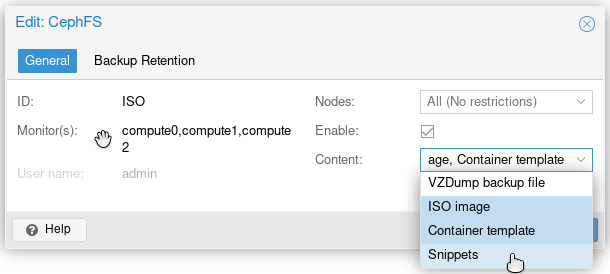
We need to prepare the Proxmox VE Snippet Storage to upload the cloud-init config. Many users utilize the local storage and activate the snippet property. The downside to this approach is that you have to copy the cloud-init file to each node. Our cluster uses Ceph for storage, and the ISO storage uses CephFS, making it available to each node. This means we only need to copy the file once.
In the Proxmox GUI, navigate to Datacenter > Storage > <your storage> > Edit.

Used Ansible Modules
First, we need to determine the proper Ansible modules to set up the VM. While there are many modules available, for this example, we only need the following two:
community.general.proxmox_kvmcommunity.general.proxmox_disk
A common mistake is to use the module community.general.proxmox, which only controls LXC containers, not virtual machines. If you plan to use a real virtual machine, you must use the community.general.proxmox_kvm module. Additionally, we need the community.general.proxmox_disk module.
Preparing the Ansible Role
Our role is coded under roles/proxmox_create_demo_vm.
defaults/main.yaml
First, let’s look at the file defaults/main.yaml where our variables are defined. This file is intended to be self-explanatory, and we believe our explanations throughout the file will help you understand it better.
---
# defaults/main.yaml
# API
api_host: "compute0"
api_user: "root@pam"
api_token_id: "ansible"
api_token_secret: "9628193b-900f-4bb6-ab70-321e37bfcb42"

# Node where the VM shall be started
proxmox_node: "compute0"

# Name of the Debian Clone Template
clone_name: "Debian12"

# For cloud-init
domain_name: codeschoepfer.de
timezone: "Europe/Berlin"
locale: "en_US.UTF-8"

# Snippet-Storage
snippets_path: "/mnt/pve/ISO/snippets/"
snippets_storage: "ISO"

# VM-Storage
vm_storage: "SSD-Pool"

# Vars for the VM itself DemoVM
vm_name: "demoVM"
vm_memory: 2048
vm_cores: 2
vm_disk_size: "32G"
vm_disk_type: "scsi0"
cloudinit_user: "demo"
vm_bridge: "vmbr0"
vlan_id: 77
fw_enabled: 0
templates/user-data.yml.j2
We created an Ansible template templates/user-data.yml.j2 that references the variables in defaults/main.yaml.
Please note: The first line must be
#cloud-config.
This file is intended to be self-explanatory. If you need more information about the cloud-init syntax, please refer to the cloud-init documentation on readthedocs.io.
It is important to know the this user-data replaces the config setup in the Proxmox VE GUI.
#cloud-config

hostname: {{ vm_name }}
timezone: {{ timezone }}

user: {{ cloudinit_user }}

manage_etc_hosts: localhost
fqdn: {{ vm_name }}.{{ domain_name }}

ssh_authorized_keys:
  - ssh-ed25519 AAAAC3NzaC1lZDI1NTE5AAAAIKwljN8BQnU3PAp4RGij/QPPihXqZNXGv7NlLCJxVB4U demokey@codeschoepfer.de

chpasswd:
  expire: false
users:
  - default

package_update: true
package_upgrade: true

packages:
  - needrestart
  - qemu-guest-agent

runcmd:
  - timedatectl set-ntp true
  - locale-gen {{ locale }}
  - localectl set-locale LANG={{ locale }}
  - systemctl enable qemu-guest-agent
  - systemctl start qemu-guest-agent

power_state:
  mode: reboot
tasks/main.yaml
Our main tasks file for deploying a single VM is structured as follows. We will explain the different sections below.
---
- name: Clone Debian template
  community.general.proxmox_kvm:
    api_host: "{{ api_host }}"
    api_user: "{{ api_user }}"
    api_token_id: "{{ api_token_id }}"
    api_token_secret: "{{ api_token_secret }}"
    node: "{{ proxmox_node }}"
    clone: "{{ clone_name }}"
    # newid: "{{ vm_id }}"  # Control to the given ID
    name: "{{ vm_name }}"
    full: true
    storage: "{{ vm_storage }}"
  register: state

- name: Resize disk, if needed
  community.general.proxmox_disk:
    api_host: "{{ api_host }}"
    api_user: "{{ api_user }}"
    api_token_id: "{{ api_token_id }}"
    api_token_secret: "{{ api_token_secret }}"
    vmid: "{{ state.vmid }}"
    disk: "{{ vm_disk_type }}"
    size: "{{ vm_disk_size }}"
    state: "resized"
  when: state.changed

- name: Upload Cloudinit user-data file
  ansible.builtin.template:
    src: user-data.yml.j2
    dest: "{{ snippets_path }}/{{ state.vmid }}-user-data.yml"
    mode: "0644"
  when: state.changed

- name: Modify the Cloned VM, adapt a few parameters, attach cloudinit template
  community.general.proxmox_kvm:
    api_host: "{{ api_host }}"
    api_user: "{{ api_user }}"
    api_token_id: "{{ api_token_id }}"
    api_token_secret: "{{ api_token_secret }}"
    node: "{{ proxmox_node }}"
    vmid: "{{ state.vmid }}"
    name: "{{ vm_name }}"
    cores: "{{ vm_cores }}"
    memory: "{{ vm_memory }}"
    net:
      net0: "virtio,bridge={{ vm_bridge }},tag={{ vlan_id }},firewall={{ fw_enabled }}"
    ide:
      ide2: "{{ vm_storage }}:cloudinit"
    serial:
      serial0: "socket"
    vga: serial0
    citype: nocloud
    cicustom: "user={{snippets_storage}}:snippets/{{ state.vmid }}-user-data.yml"
    agent: "enabled=1"
    update: yes
    update_unsafe: yes
  when: state.changed

- name: Start the VM
  community.general.proxmox_kvm:
    api_host: "{{ api_host }}"
    api_user: "{{ api_user }}"
    api_token_id: "{{ api_token_id }}"
    api_token_secret: "{{ api_token_secret }}"
    node: "{{ proxmox_node }}"
    vmid: "{{ state.vmid }}"
    name: "{{ vm_name }}"
    state: started
  when: state.changed
Authentification
Almost every task in here contains those lines to connect to Proxmox API:
    api_host: "{{ api_host }}"
    api_user: "{{ api_user }}"
    api_token_id: "{{ api_token_id }}"
    api_token_secret: "{{ api_token_secret }}"
These lines are for authentification, referring to variables defined in defaults/main.yaml.
Create VM out of the Proxmox Template
This will create a full clone on the storage {{ vm_storage }} from the template {{ clone_name }} with the name {{ vm_name }}. The VM ID is chosen by Proxmox VE itself, but you can specify a VM ID using the newid field if you prefer.
- name: Clone Debian template
  community.general.proxmox_kvm:
    node: "{{ proxmox_node }}"
    clone: "{{ clone_name }}"
    # newid: "{{ vm_id }}"  # Control to the given ID
    name: "{{ vm_name }}"
    full: true
    storage: "{{ vm_storage }}"
  register: state
Resize Disk
The VM template contains only a small disk, so we will likely want to resize the disk to {{ vm_disk_size }}. Note that the module community.general.proxmox_disk needs to know the VM ID state.vmid, which is already registered in the dictionary state by the previous section.
- name: Resize disk, if needed
  community.general.proxmox_disk:
    vmid: "{{ state.vmid }}"
    disk: "{{ vm_disk_type }}"
    size: "{{ vm_disk_size }}"
    state: "resized"
  when: state.changed
Copying the Cloud-init User-data
We will send the prepared cloud-init user-data to the snippet storage we configured earlier.
- name: Upload Cloudinit user-data file
  ansible.builtin.template:
    src: user-data.yml.j2
    dest: "{{ snippets_path }}/{{ state.vmid }}-user-data.yml"
    mode: "0644"
  when: state.changed
Copying the Cloud-init User-data
Then we adopt the VM hardware config. To give it the desired number of CPU cores, memory, network. To activate the VM agent.
- name: Modify the Cloned VM, adapt a few parameters, attach cloudinit template
  community.general.proxmox_kvm:
    node: "{{ proxmox_node }}"
    vmid: "{{ state.vmid }}"
    name: "{{ vm_name }}"
    cores: "{{ vm_cores }}"
    memory: "{{ vm_memory }}"
    net:
      net0: "virtio,bridge={{ vm_bridge }},tag={{ vlan_id }},firewall={{ fw_enabled }}"
    agent: "enabled=1"
The essential part for cloud-init follows. Please note, if your template already has a cloud-init storage, you can omit the ide part. The citype value is the default for GNU/Linux machines. The cicustom parameter is a pointer to the user-data. As mentioned, it will overwrite any cloud-init configuration specified by the Proxmox VE GUI.
    ide:
      ide2: "{{ vm_storage }}:cloudinit"
    citype: nocloud
    cicustom: "user={{snippets_storage}}:snippets/{{ state.vmid }}-user-data.yml"
Most cloud images come only with a serial console enabled. If you have such an image, you need the following lines, otherwise, you can omit them.
    serial:
      serial0: "socket"
    vga: serial0
We need to use the update parameter because of the changed hardware configuration. The update_unsafe parameter is required because we modified the net parameter and created a new storage for cloud-init. For more information, refer to the Ansible Documentation.
    update: yes
    update_unsafe: yes
Start of the VM
Finally, we start the VM with the following code block:
- name: Start the VM
  community.general.proxmox_kvm:
    node: "{{ proxmox_node }}"
    vmid: "{{ state.vmid }}"
    name: "{{ vm_name }}"
    state: started
  when: state.changed
Executing the Ansible Role
After submitting the following playbook, which refers to the role proxmox_create_demo_vm:
---
# Create Demo VM
- name: Create Demo VM
  hosts: pve_compute0
  roles:
    - role: proxmox_create_demo_vm
➜ ansible-playbook proxmox_create_demo_vm.yaml -i hosts.ini
PLAY [Create Demo VM] *********************************************************************
TASK [Gathering Facts] ********************************************************************
ok: [compute0]
TASK [proxmox_create_demo_vm : Clone Debian template] *************************************
changed: [compute0]
TASK [proxmox_create_demo_vm : Resize disk, if needed] ************************************
changed: [compute0]
TASK [proxmox_create_demo_vm : Upload Cloudinit user-data file] ***************************
ok: [compute0]
TASK [proxmox_create_demo_vm : Modify the Cloned VM, adapt a few parameters, attach cloudinit template] ***
changed: [compute0]
TASK [proxmox_create_demo_vm : Start the VM] **********************************************
changed: [compute0]
PLAY RECAP ********************************************************************************
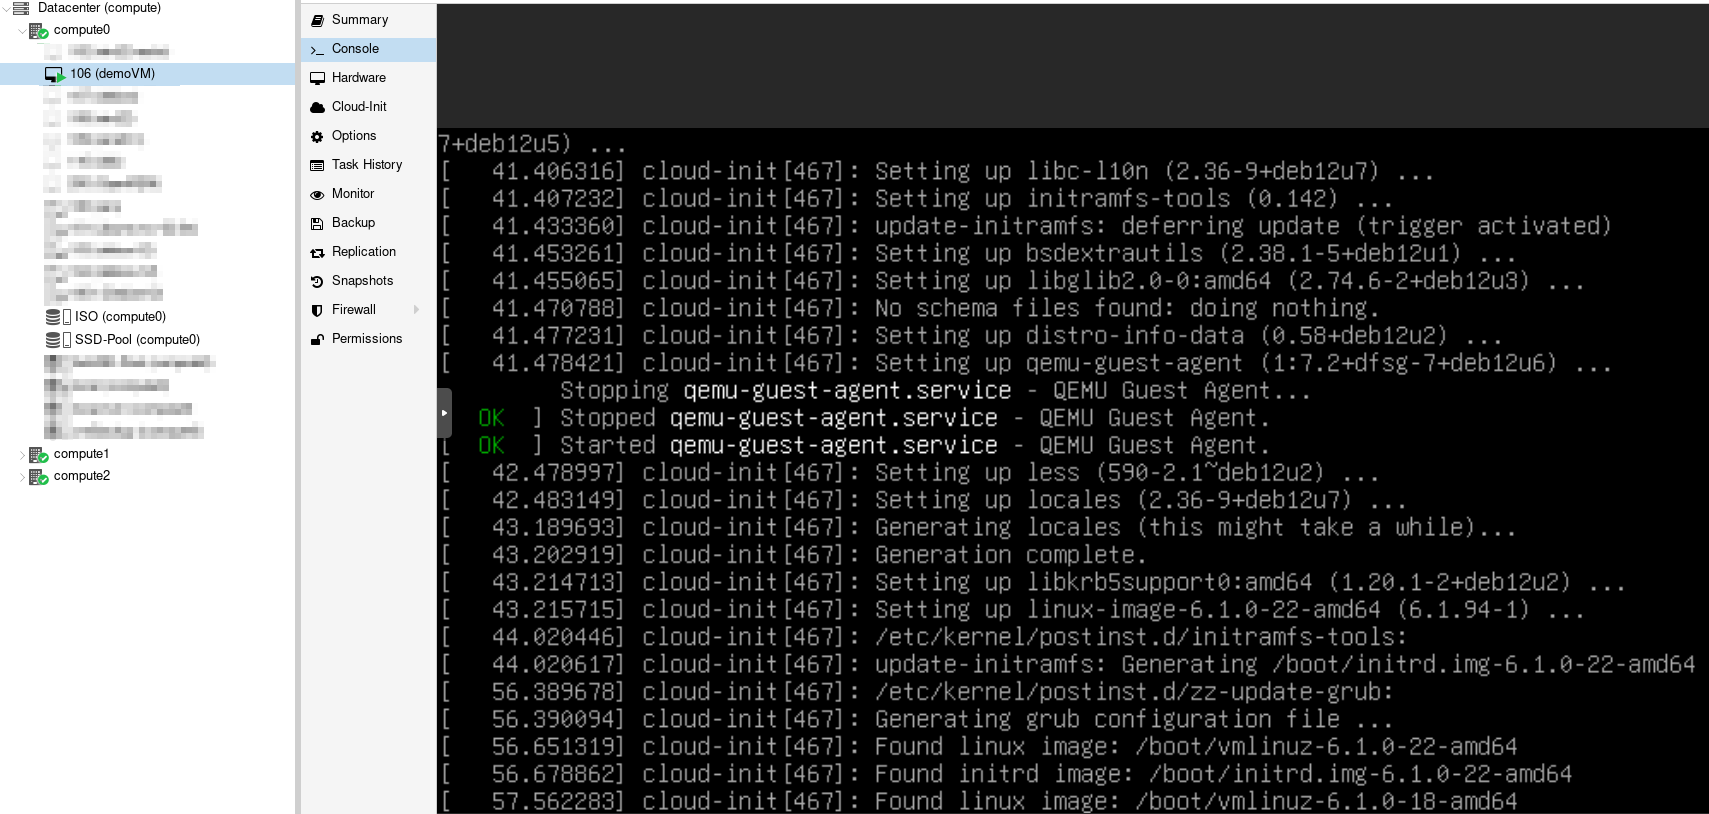
compute0 : ok=7 changed=4 unreachable=0 failed=0 skipped=0 rescued=0 ignored=0 The new VM is now configured and starting in the Proxmox VE GUI, and cloud-init begins its work.

Final Thoughts
Deploying a VM on Proxmox VE using Ansible simplifies the process and enhances efficiency. By leveraging the Proxmox API for VM integration and cloud-init for VM configuration, you can achieve a streamlined and automated deployment workflow. We used a simple Debian GNU/Linux VM for demonstration, but this method works with any operating system supported by Proxmox.
With the steps outlined, you can easily adapt and expand the process to suit your specific needs, allowing you to roll out multiple virtual machines within minutes. Automation tools like Ansible not only save time but also ensure consistency across your deployments, making them invaluable for managing virtualized environments.
